1. Dark background with fade at bottom
Dark-background slides look more professional for a trial, making the screen less of a focus than a light-background screen. A slightly nicer version is a dark background that fades to light just a little at the bottom.
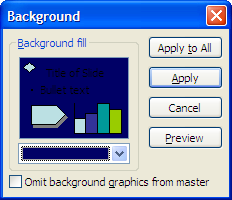
To make it, start with a blank presentation. Then click on Format -> Background and use the drop-down arrow to get color choices. I usually pick More Colors so I can get a dark blue.

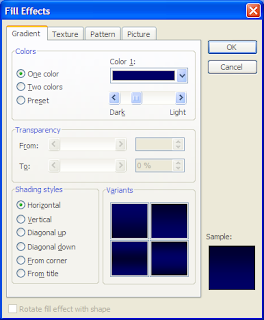
Then click on the same drop-down arrow, select Fill Effects, and click the Gradient tab, and click on the version of the gradient that is lighter on the bottom.

Then click Apply to all and you're done.
2. Put a picture of a document on a slide
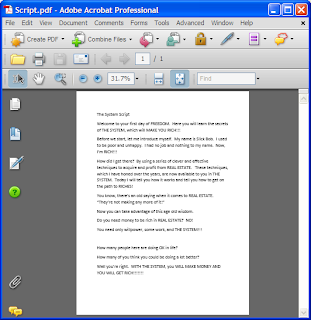
Showing a document on screen is easy. Scan the document to PDF and open it in Acrobat. Then (in Acrobat 8) click Tools -> Select & Zoom -> Snapshot tool to get the graphics selector. You can drag it to select an area or click somewhere on the side of the document to select the whole page.

Do that. Then go to PowerPoint and on the blank slide paste the image (Ctrl-V). Drag the corners to expand or shrink it until it looks right. Hold the Ctrl key down to shrink or expand the document symmetrically.
3. Create a build from one slide to the next
If you are going to build on a slide, in the slide sorter (the sequence of slides on the left of PowerPoint) click on the slide you want to duplicate and hit Ctrl-D. A duplicate should appear below it.
4. Blow up part of a document.
Go back to Acrobat, zoom in so the document is bigger. Then use the same graphics select tool mentioned in point 2. But this time select the paragraph you want. Acrobat will copy that portion. Then flip to PowerPoint and paste it over the document you pasted there earlier. Because Acrobat was showing the document blown up, the part you just copy will be bigger. Drag to resize. Also, select the box you just pasted, right-click and select Format picture, click on the Color and lines tab, and select a line color like black. It should not say None in that box. That will draw a line around your box to make it stand out from the background.
4. Underline key words and phrases
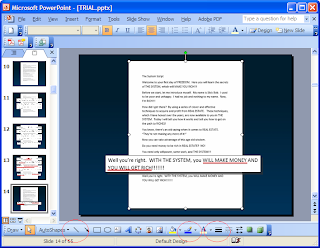
Now you have a blow up of a key paragraph. Click on a slide and hit Ctrl-D in slide sorter to duplicate that slide with the blow up. Use the line tool (click on the button for it on the bottom of PowerPoint 2003) and drag on the bottom of the sentence you want to underline from where you want to start to where you want to end. That will draw a thin, black line underneath the sentence. While that line is still selected (when you draw it, it is), click on the other tools to first increase its size and then change its color to red. I've circled those three tools (draw line, line color, and line width) below.

5. Quote text
Text is easy to quote. Insert a text box and start typing. Change the font to larger and as needed for appearance. For transcripts, I like Courier New font. For cases, I like Times New Roman. The use of different fonts helps identify context to the viewer grasps what is happening more quickly.
As you can tell from my style, I believe simple slides are the best. Don't use headings and bullet points, if you can help it. These basic tips will cover most of the tasks you want to handle in PowerPoint for presentations.
4 comments:
Todd: After blowing up text and brining it into PowerPoint, how do I highlight the blown up text in yellow?
Good question. I like underlining, because PowerPoint does not have a highlighting tool for graphics. But there is a way to do pretty much the same thing.
Use the rectangle tool to cover the text (the part of the graphic you blew up) you want, then format the rectangle you draw to be transparent and yellow. Do that by right-clicking on the object and selecting Format. The fill and line (outside border line) color settings are there. They include a transparency slider. I set it to 70% usually.
The reason that isn't the same as actual highlighting as computers do it is that the transparent rectangle obscures not only the white background, but also the black text. It still works pretty well, however.
Also, you can use an external tool to create that effect, like a graphics editor. That's more money and/or a more involved story.
Thanks for sharing Todd, great blog. Want to tell you about one more tip of using the PowerPoint. Using PowerPoint templates http://www.pptstar.com/powerpoint/computers/ you can create quality presentations without spending time to create graphic design for your each new presentation. Try to and I'm sure you'll like it. Good luck.
buy an essay cheap
Post a Comment